
WordPress shortcodes are a neat function to add interactive and dynamic content to any of your WordPress pages or posts. From simple to complex page contents, you can easily add it by just a simple “shortcode” (Shortcut Code).
For example, if you want to add custom post suggestion below your blog post, you can just simply add this shortcode at the bottom of your post editor:
[suggestpost]… of course, it will not work if you just copy that shortcode and put it on your website. You still need to write the callback function for that where all of the logic is located so that “[suggestpost]” shortcode will be able to reference it from the backend and ultimately display the result on your frontend.
It’s just an overview, so don’t worry if you are still unsure how this all works. Even if you’re a complete beginner or an intermediate user of WordPress shortcode, all can benefit from this complete guide and if you spend time and effort to understand this article, you will come out as an advanced WordPress shortcode user.
So, read on! Let’s start at the basics and foundation.
What is a WordPress shortcode?
WordPress shortcodes are a shortcut code of the much bigger code in the backend. You’ll know it’s a WordPress shortcode when you see a text on your editor that looks something like this: “[myshortcode]”, it’s a text identifier that is wrapped in square bracket tags [].
Think of it as the tip of the iceberg, you can see the tip of the iceberg as just a small block of ice but at the bottom, there is depth beyond depth below it.

WordPress shortcode generator
We developed an online tool where you can generate WordPress shortcodes from simple to complex shortcodes. Just visit our WordPress Shortcode Generator tool and jumpstart your WordPress shortcode development.
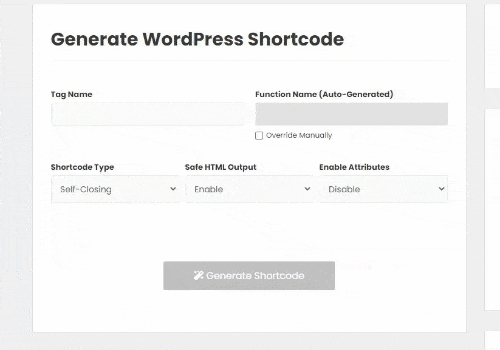
Now, this tool is only useful if you already know how WordPress shortcode works from top to bottom. Continue reading below to understand it better before using any tool. Bookmark our WordPress Shortcode Generator for now and get back to it once you already know how to create one manually.
What are WordPress shortcodes and why use them?
In a nutshell, we use WordPress shortcodes to easily reference huge chunks of code logic or dynamic content in the backend by just calling out a shortcut code for it.
For security reasons, WordPress filters the content of your pages and posts. This means in the content editor you can only write and add HTML elements and cannot add PHP codes directly if you need more functionality for that page.
This is where WordPress shortcodes become necessary if you want to extend more custom functionality into your site. It allows you to add your PHP code logic into a function and register that function as a WordPress shortcode.
WordPress shortcode also helps users that have zero knowledge in coding, as they can easily call a shortcut code in the content editor without having to stare at long and complicated PHP codes.
The difference between Shortcodes and Gutenberg Blocks
Upon the introduction of Gutenberg when WordPress 5.0 was released. The desirability of shortcodes is reduced as Gutenberg blocks can mostly do it without having to write the WordPress shortcode mockup.
Gutenberg even comes with a dedicated block to add shortcodes. Blocks are the new shortcodes.
Although, this is not the end of WordPress shortcode as it is more scalable and customizable than Gutenberg Block.
There are 2 types of WordPress shortcode

Enclosing Shortcodes – Needs a closing tag. Enclosing shortcodes pull and manipulate the content between the opening and closing tag. Example:
[myshortcode]Hello World![/myshortcode]Self-closing Shortcodes – Doesn’t need a closing tag. Example:
[myshortcode]How to add custom attributes to WordPress Shortcode
You can also pass a custom attribute to a shortcode whether it’s an Enclosing Shortcode or Self-closing shortcode.
Example on what it would look like if you pass custom to a WordPress shortcode:
[myshortcode attr1=”param123” attr2=”paramABC”] [myshortcode attr1=”param123” attr2=”paramABC”] Hello World! [/myshortcode]By adding a custom attribute on WordPress shortcode, the value of these attributes can be passed on the callback PHP function on the backend and use it depending on how it’s supposed to be used.
The example use case of custom attributes on WordPress shortcode is when you want dynamic result of one shortcode:
[suggestpost category=”swimming”]… and on the other page or post you can use the same WordPress shortcode but with different custom attribute to expect different result:
[suggestpost category=”biking”]Understanding the WordPress shortcode function
To fully understand the WordPress Shortcode API function, let’s dissect it’s code structure:
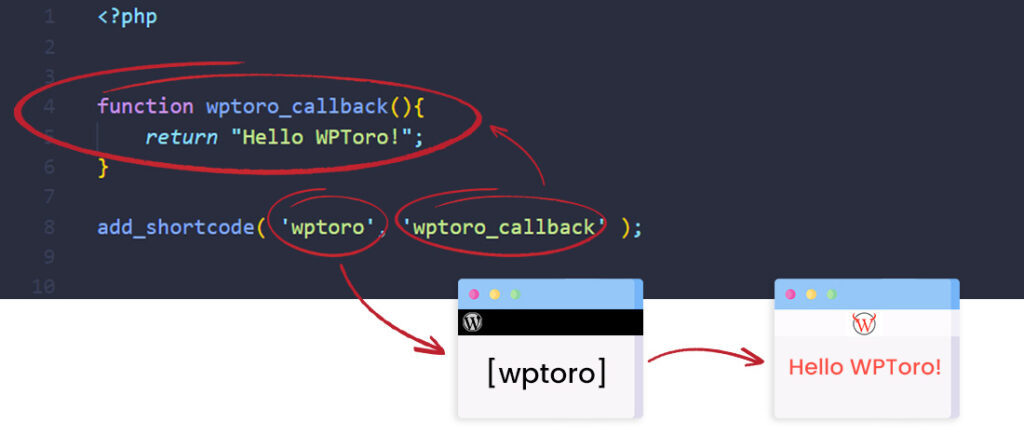
In the sample image above we are using the Self-closing Shortcode.
What is add_shortcode()?
WordPress add_shortcode is the default function in WordPress to register a new shortcode. As you can see on the image above this function requires two parameters:
- Tag (which we set as ‘wptoro’) – This is the shortcode unique identifier that you will use on your WordPress editor. You can name this to whatever you want, just make sure that is not common enough where it might get conflicted with other shortcodes generated by your theme or the plugins you installed. Make sure to add a dash or underscore instead of blank spaces. Example: [my_new_awesome_shortcode]
- Callback (which we set as ‘wptoro_callback’) – This is where you put the callback function name that contains all the code logic and dynamic content to be returned and ultimately be displayed by your shortcode. You can also name this to whatever you want, but the same as the first parameter, you need to make sure it’s not common enough and also don’t add blank spaces.
Now, let’s dissect the more advanced WordPress Shortcode API function, where we can pass custom parameters and content.
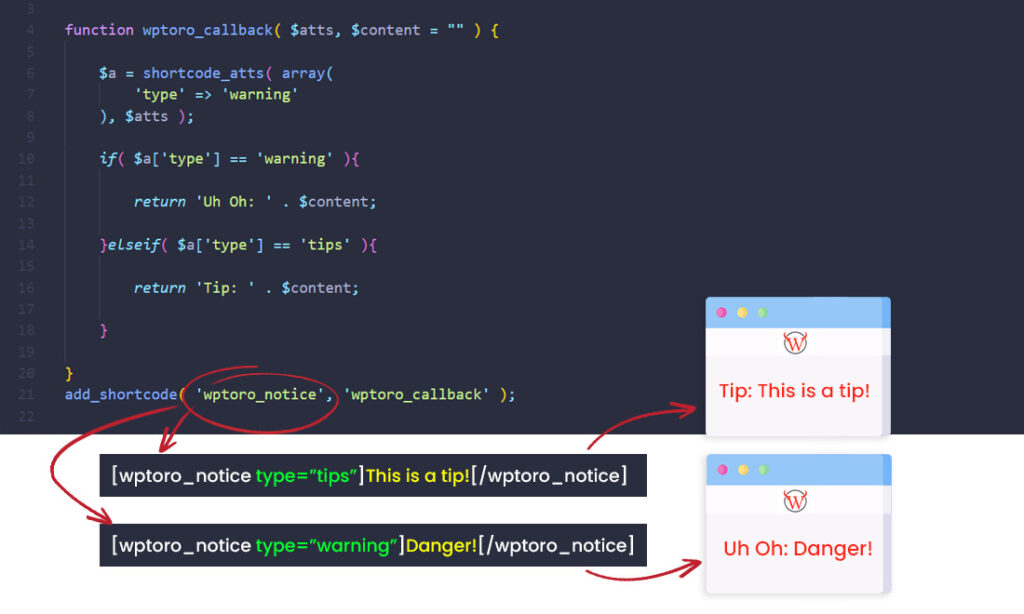
Let’s analyze the image above since we already know the basics of the add_shortcode code structure. We also know that the sample shortcode above is the Enclosing Shortcode type. We’ll tackle how the custom attribute and content are passed. In the image sample above we are using a single shortcode which is “[wptoro_notice]” but you can see that it has two different results.
On the callback “wptoro_callback” we passed 2 parameters:
- $atts – This is where the “type” attribute is stored and passed. The “type” attribute is the color green text in the image above. It’s also important to mention that this can hold as many attributes as you want and not just only one. For example, we can add 3 attributes like this: [wptoro_notice type=”warning” bgcolor=”red” toggle=”enabled”]
- $content – This is where the content is stored and passed. The content is the color yellow text in the image above. As this is an Enclosing Shortcode type, anything you add between the opening and closing tag will be the passed content to your callback function.
What is shortcode_atts()?

WordPress shortcode_atts combine the user attributes with known attributes and fill in defaults when needed. It also requires two parameters and one optional parameter to be passed on the function:
shortcode_atts( array $pairs, array $atts, string $shortcode = '' )- $pairs (required) – Entire list of supported attributes and their defaults. If the attribute is not found then the default your set in here will be called. For example, we added a ‘type’ attribute that has a ‘warning’ value. If we write the shortcode that is supposed to have an attribute but we did not add one like this: [wptoro_notice]Hello[/wptoro_notice] then the default ‘type’ => ‘warning’ attribute will be used.
- $atts (required) – User-defined attributes in shortcode tag. These are the attributes you add on your shortcode like this where we add the ‘type’ attribute: [wptoro_notice type=”tips”]Hello[/wptoro_notice]
- $shortcode (optional) – The name of the shortcode, provided for context to enable filtering. This means, it’s an optional parameter and you don’t need to add it if you don’t plan on adding filters to your WordPress shortcode.
What is extract() in WordPress shortcode and what does it do?
Long story short, do not use the extract() function on your WordPress shortcode.
… but why?
Some of the WordPress shortcodes you find on the guides and tutorials online are using an “extract()” function. This function is not a WordPress default function but rather it’s a PHP function. Some developers use this function to extract the array keys, set these as variable names and their values as variable values. Example: ‘type’ => ‘warning’ becomes $type = ‘warning’.
… it looks something like this:

As you can see on the image above before we are using “$a[‘type’]” to get the value of type on the array. But in the image above it is now directly using “$type” when we added the extract() function. Now, you could say this is a handy function and you should use it.
… Don’t!
This is a very bad code style and has a lot of security concerns. It’s even discouraged by WP coding standards, and that’s something!
You can also visit Sucuri’s article on backdoor security vulnerability for more information.
WordPress shortcode echo or return. What’s the proper way?
Generally, you can use both echo and return in WordPress shortcodes. But the proper way would be to use return.
… but why?
If you use echo in the shortcode callback function, the information will show up where the shortcode is processed, which isn’t necessarily where you actually added your shortcode. This means if you use echo the content from the shortcode would show on the very top of your page and not on your page content where you added your shortcode.
By using return, the information from the shortcode callback function will display exactly where you added the shortcode within the page.
How to create your own WordPress shortcode
Get ready to get your hands dirty as we are now on the hands on part of the guide.
But before we start, we need to understand and know where to add these codes to your WordPress site. Basically, you need to add the code we are about to create below to your active theme’s functions.php.
Do you know how to add custom code snippets on your WordPress site? If the answer is NO, then visit our guide on how to add custom code snippets safely into your WordPress site first before continuing on the guide below.
To create your own shortcode, you need to know what kind of shortcode you need. As you recall in the guide above, there are 2 types of shortcodes. In the examples below we will tackle the two types of shortcodes and what are their use cases, so compare them to what you are trying to achieve if it’s the same as your requirement.
Create a simple WordPress shortcode
First, let’s create a simple WordPress shortcode where we display the current year.
Why would we want to create a shortcode to display the current year, you ask?
Well, instead of writing “Copyright 2021” it would be more convenient to just write “Copyright [current_year]”. By this, you will not have to go and edit that text on a yearly basis to change it to the current year. Instead, the shortcode will do it for you automatically.
Here are the basic steps to create this simple WordPress shortcode:
- Follow these steps on how to safely add the WordPress shortcode on your site. Once you’re on the code snippet code editor, continue on below.
- Create the callback function.
- Register the shortcode.
- Test the shortcode.
Steps on how to safely add the WordPress shortcode
If you don’t know where to write or put your shortcode. Follow our guide first on how to add WordPress shortcodes on your site.
Create the callback function
By now you already have an idea of what the callback function is if you didn’t skip the explanation above. But to recap, this is the function where you put all the logic and contents to be referenced by your shortcode.
function wp_toro_current_year(){
    //Get current year and return it
    return date('Y');
}
Register the shortcode
To register a shortcode we need to call the add_shortcode() function. If you’re still unsure what this function is, you can read it again on the guide above.
add_shortcode( 'current_year', 'wp_toro_current_year' )… we should have the complete code like this below:
function wp_toro_current_year(){
    return date('Y');
}
add_shortcode( 'current_year', 'wp_toro_current_year' );
Test the shortcode
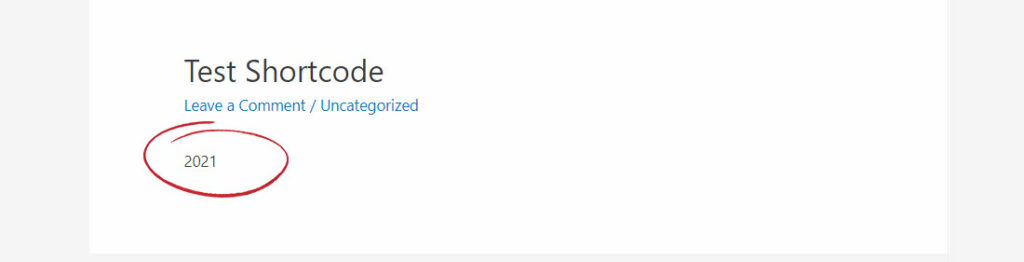
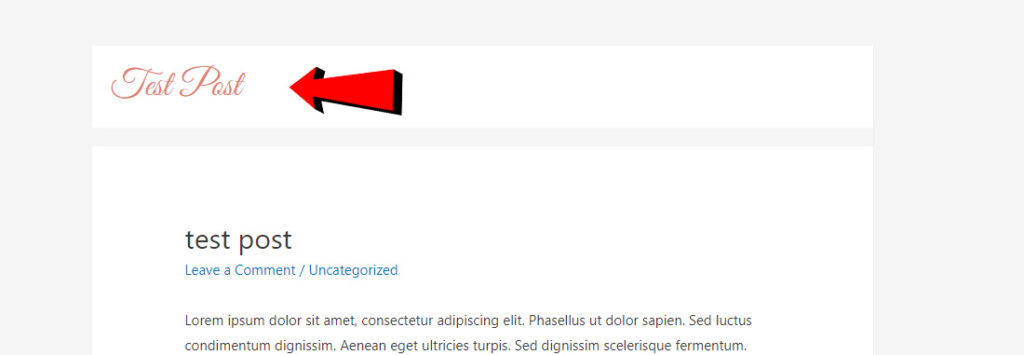
[current_year]Our new simple shortcode should now be ready to use. To make sure it works properly we need to test it. The easiest and fastest way to test your new shortcode would be to create a dummy post, add the shortcode and then save your post as a draft and then click preview.
- In your WordPress administration area, go to Posts » Add New
- In the post editor, you can insert the new shortcode: [current_year]
- For Gutenberg – Click on the “+” icon and then search for “shortcode”, then click on the shortcode block to add it. Then add our new shortcode there.
- For Classic Editor – Just simply paste the shortcode into the content editor.
- Save the test post as a draft and then click on the Preview button to check the frontend and see the result of your shortcode
… based on the steps we followed above the result should look something like this:
Create advanced WordPress shortcode
Now that we know how to create a simple WordPress shortcode, let’s jump right in and create a more advanced shortcode. We will be combining custom attributes and parameters in WordPress’s shortcode with Enclosing and Self-closing type shortcode.
… Let’s begin!
WordPress shortcode to display posts from a category with multiple parameters
In this advanced WordPress shortcode tutorial, we will be creating a functionality where we can display recent posts per category and also be able to dynamically set the post count and display column.
Basically, since we already covered the basics of the shortcode creation on the simple WordPress shortcode above tutorial, just refer to it and then see the extended version below.
Complete code example:
<?php
function wptoro_recent_posts($atts, $content = '')
{

    $att = shortcode_atts(array(
        'category_name' => '',
        'count' => 2,
        'column' => 2
    ), $atts, 'recent-posts');

    $args = array(
        'numberposts' => $att['count'], //The number of posts to be displayed
        'post_status' => 'publish' // Show only the published posts
    );

    //Condition to filter the recent post by category if the attribute is present
    if ($att['category_name'] != '') {
        $args['category_name'] = $att['category_name'];
    }

    $recent_posts = wp_get_recent_posts($args);

    ob_start();

?>

    <div class="wptoro-recent-post-wrapper">
        <!-- Shorthand If/Else condition to check if there is content passed in to the shortcode and display it -->
        <?php echo $content != '' ? '<h2>' . $content . '</h2>' : ''; ?>

        <ul class="wptoro-recent-posts" style="columns:<?php echo $att['column']; ?>;-webkit-columns:<?php echo $att['column']; ?>;-moz-columns:<?php echo $att['column']; ?>;">

            <?php foreach ($recent_posts as $post_item) : ?>

                <li>
                    <a href="<?php echo get_permalink($post_item['ID']) ?>">
                        <?php echo get_the_post_thumbnail($post_item['ID'], 'full'); ?>
                        <h4 class="recent-post-title"><?php echo $post_item['post_title']; ?></h4>
                    </a>
                </li>

            <?php endforeach; ?>

        </ul>
    </div>

<?php

    return ob_get_clean();
}

add_shortcode('wptoro-recent-posts', 'wptoro_recent_posts');
?>
To display our recent posts as visually appealing, let’s apply some styling to it via CSS:
.wptoro-recent-post-wrapper h2 {
  color: #ff5349;
  font-weight: bold;
  text-align: center;
}
.wptoro-recent-posts {
  margin: 0;
  list-style-position: inside;
  list-style-type: none;
  column-gap: 20px;
  -moz-column-gap: 20px;
  -webkit-column-gap: 20px;
}
.wptoro-recent-posts li h4 {
  font-size: 16px;
  margin-top: 5px;
}
If you’re not sure where to put the CSS code above, follow these steps:
- On your WordPress dashboard go to Appearance > Customize.
- Click on Additional CSS.
- Paste the code above into the WordPress CSS code editor.
- Click on the Publish button to save your new CSS code.
… That’s it!
Now that our advanced WordPress shortcode is ready, we can use these WordPress shortcodes anywhere on your website:
Example Advanced Shortcode Usage 1:
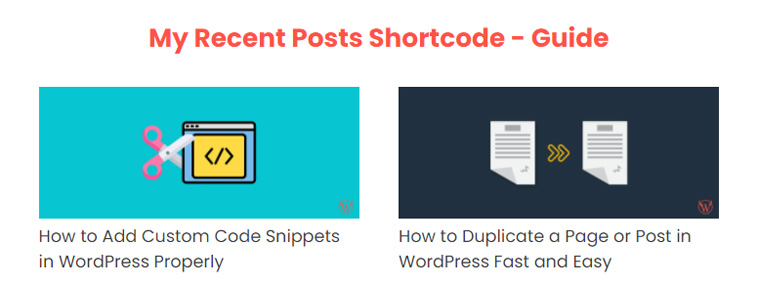
[wptoro-recent-posts category_name="guide" count="2" column="2"]My Recent Posts Shortcode - Guide[/wptoro-recent-posts]Displays the recent post in the category of “guide” with a maximum display of 2 posts and we also set the column count to 2. We also added dynamic content between the opening and closing tags of the WordPress shortcode as the heading of our block.
Result:
Example Advanced Shortcode Usage 2:
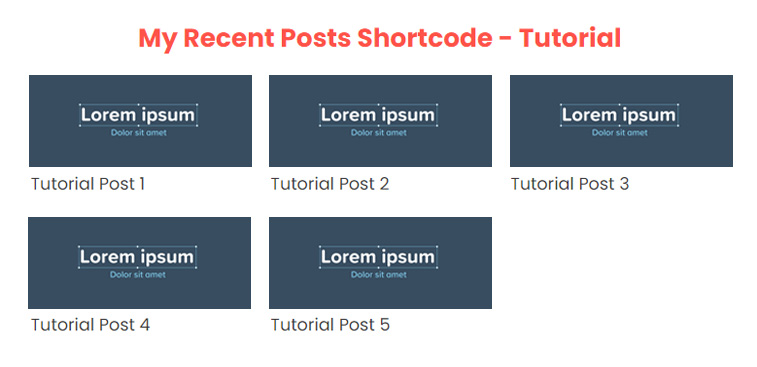
[wptoro-recent-posts category_name="tutorial" count="5" column="3"]My Recent Posts Shortcode - Tutorial[/wptoro-recent-posts]Displays the recent post in the category of “tutorial” with a maximum display of 5 posts and we also set the column count to 3. We also added dynamic content between the opening and closing tags of the WordPress shortcode as the heading of our block.
Result:
Example Advanced Shortcode Usage 3:
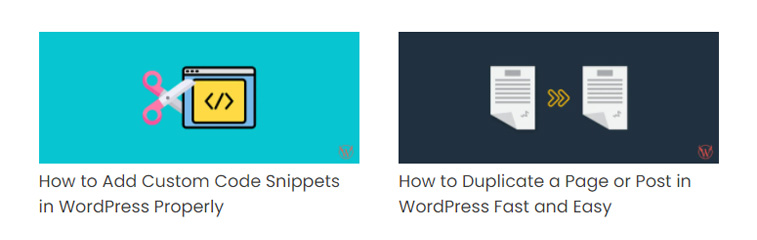
[wptoro-recent-posts]For this WordPress shortcode you’ll notice that we didn’t add the custom attributes: category, count, and column. We also didn’t use the enclosing type shortcode and add content between the opening and closing tags. This is still a valid and working shortcode, as you remember in our topic above for shortcode_atts we talked about the default values for the attributes.
In our shortcode_atts code above, we set the default values of category to blank, count to 2, and column to 2. By these default values our [wptoro-recent-posts] shortcode will only pull 2 recent posts no matter what category is the post and it will display in 2 columns.
Result:
How to use HTML elements in your WordPress Shortcode
Displaying HTML elements in your WordPress shortcodes can be tricky sometimes as if you don’t do it properly it could display at the very top of your page instead of in the content body. It can also display in the administrator area where you edit your post or page.
On our advanced WordPress shortcode above, you’ll notice that we did use some HTML elements in the code. But which part did the trick in order for it to work and display properly?
… tadah!
ob_start() and ob_get_clean()Think of these two functions as the opening and closing tags. Anything you add between these two will get saved and returned into the callback function.
In a nutshell, ob_start() means start remembering everything that would normally be outputted, but don’t quite do anything with it yet. Meaning, anything that is about to be printed or echoed on the front-end will be saved but not yet released.
On the other hand, ob_get_clean() means stop saving things and release or output whatever was saved all at once. That’s why it’s the ob_get_clean() was returned in our callback function.
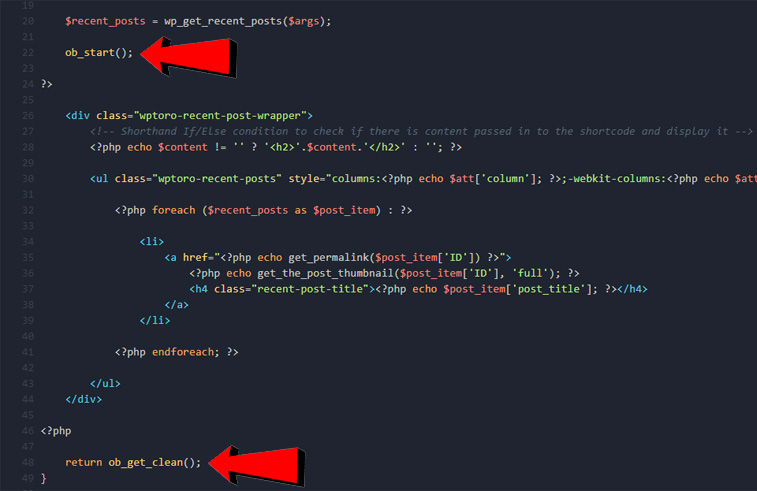
… pretty neat, right?
The built-in shortcodes in WordPress
By default, WordPress includes the following shortcodes:
- [gallery] – Displays a gallery of images easily, it also accepts multiple parameters to customize the display of your images.
- [audio] – Easily embed your audio files inserting the URL of the audio in an “src” parameter like this: [audio src="audio-source.mp3"]
- [video] – If you have self-hosted videos, using this shortcode will be beneficial.
- [playlist] – Display a collection of audio or video files.
- [caption] – Wrap captions around content.
WooCommerce default shortcodes
If you’re using WooCommerce for your ecommerce websites, it’s important to know their built-in shortcodes as well:
- [woocommerce_cart] – Easily create a cart page. Create a blank page and just add this shortcode to the content editor and then your page should now be a WooCommerce cart page.
- [woocommerce_checkout] – This shows the checkout page. Create a blank page and just add this shortcode to the content editor and then your page should now be a WooCommerce checkout page.
- [woocommerce_my_account] – This generates the account page for you customer. Create a blank page and just add this shortcode to the content editor and then your page should now be a WooCommerce customer’s account page. Customers can check their order history here as well as update their billing and shipping details.
- [woocommerce_order_tracking] – This shows the order tracking form. This is just a basic order tracking form which displays the order status. If you want more advanced order tracking functionality for WooCommerce, check out this order tracking plugin from YITH.
- [products] – This shows the WooCommerce product list. This type of shortcode accepts custom attributes to customize the result based on your requirement. Go to WooCommerce’s [products] documentation for this shortcode for more information.
- [product_category] – Will display products in a specified product category. This type of shortcode also accepts custom attributes to customize it more based upon your requirement. Visit WooCommerce’s [product_category] documentation for this shortcode for more information.
- [product_categories] – Will display all your product categories as a list, not like the [product_category] above on which it will display the products inside the category. It also accepts multiple custom attributes to customize the result of this WooCommerce shortcode. Go to WooCommerce’s [product_categories] documentation for this shortcode for more information.
How to use WordPress shortcode in Posts and Pages
To recap, we can use the WordPress shortcode directly into the post or page editor by simply pasting it to the content editor. For ready-made WordPress shortcodes like the WordPress default shortcodes or the WooCommerce default shortcode, you just have to copy and paste it and it should work out of the box.
How to use WordPress shortcode on Classic Editor
For some new users of WordPress, they are introduced directly to the new content editor of WordPress which is Gutenberg. Then, when they get to work on another website that was still using Classic Editor they’re confused on how to add a shortcode in there. Don’t overthink it and just copy and paste the WordPress shortcode in there and it should work. Just make sure you’re using the Visual editor and not the Text editor.

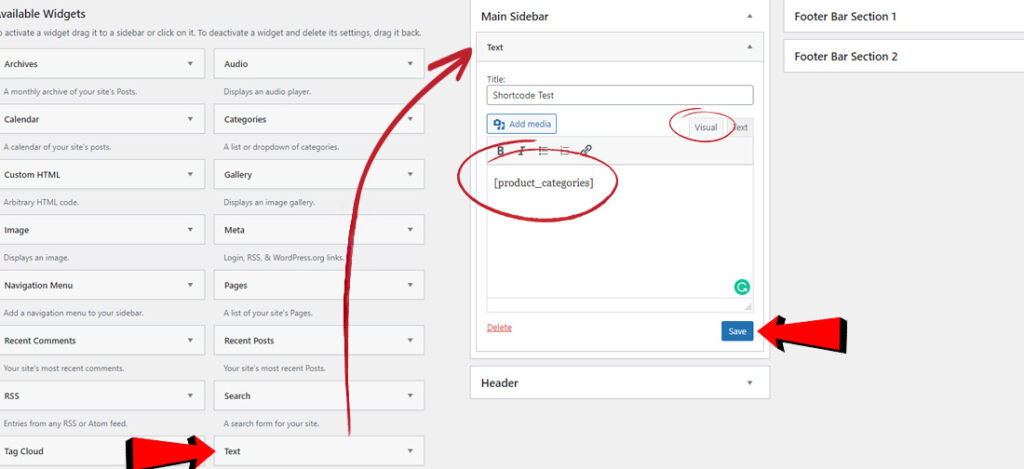
How to insert WordPress shortcode in Sidebar Widgets
We can insert a WordPress shortcode to the sidebar widgets. To insert one, go to Appearance » Widgets and just simply add a text widget to the sidebar area and paste the WordPress shortcode to the editor. Same as the Classic editor above, make sure to select Visual editor. Make sure to hit the Save button after you’ve added your shortcode.
How to use WordPress shortcode on PHP template
Sometimes the things we need in order for us to improve our WordPress website is to update something on a template level. For example, if we want to add something on the top part of all of our posts, then we will have to update our theme’s single.php file for this. Unless of course, it doesn’t have a hook to let us insert some content there easily, as some themes have this functionality out of the box.

Also, before updating anything on your active theme’s template. Make sure you’re using a Child Theme so that any update you do on the PHP templates, will not get overwritten once you update your main theme.
There are two ways to update your single.php file, You can access and edit the single.php either by using an FTP client or simply through WordPress. In this example, we will be updating it through WordPress to add WordPress shortcode in the template.
- Go to Appearance » Theme Editor
- On the right side where it says “Them Files”, find the “Single Post” or single.php file then click it.
- The code that is inside this file will vary depending on your theme, in this example, we are using the Astra theme.
- On the code editor find the part where the content is about to be displayed.
- Add your WordPress shortcode that is wrapped with do_shortcode() function. Like this: <?php echo do_shortcode(‘[wptoro_nice_post_title]’); ?>
- Make sure to “echo” the shortcode function to output it on your page.
- Make sure to add the opening and closing PHP tags.
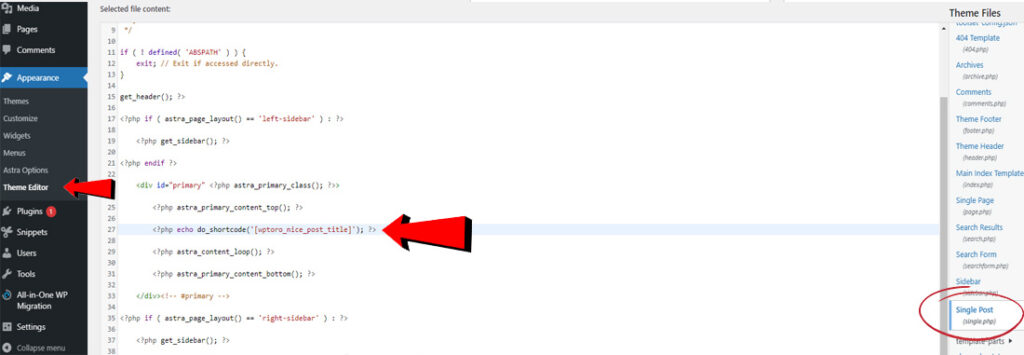
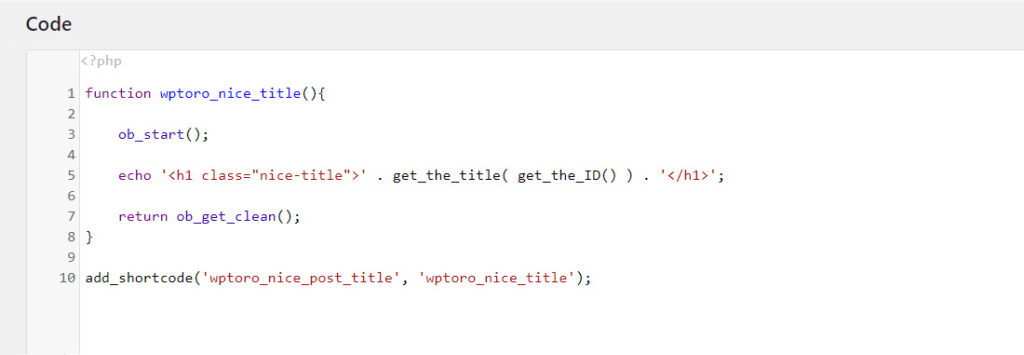
In the image above, I’ve used the shortcode [wptoro_nice_post_title]. A simple shortcode I made to display the post title with CSS styling on the top of the posts.
… the WordPress shortcode [wptoro_nice_post_title] callback function looks like this:
The result above looks like this on the front end:
What is do_shortcode()?
WordPress do_shortcode() is a default WordPress function and its main job is to wrap a WordPress shortcode like this:
echo do_shortcode( '[your_shortcode]' );Out of the box, we can only add and use a WordPress shortcode into the body of our posts or pages as well as into the WordPress widgets. However, if you want to add a WordPress shortcode into a PHP file or you want to run a shortcode into the header of your website then the do_shortcode() is the right function for you.
There are many ways to insert a WordPress shortcode in your site’s header or footer, it all depends on the theme you’re using. So make sure to check out your theme’s documentation if this is possible out of the box. But let’s assume your theme doesn’t have that easy functionality and let’s do the common way.
Basically, adding a WordPress shortcode in your site’s header or footer is the same as the guide above on how to add a WordPress shortcode on templates. So just follow that step-by-step guide but instead of editing the single.php, you can update the header.php or footer.php instead.
How to use a WordPress shortcode inside a shortcode. Is this possible?
Yes, this is possible. This is where also the do_shortcode() comes in.
Here’s an example code where we insert a shortcode inside a WordPress shortcode:
function wptoro_gallery_cb()
{

    ob_start();

    echo '<h2>WP Toro Gallery</h2>';
    echo do_shortcode('[gallery ids="572,345"]');
    echo '<p>All of the images above are copyrighted.</p>';

    return ob_get_clean();
}

add_shortcode('wptoro_gallery', 'wptoro_gallery_cb');
To understand the code above, we simply pulled the WordPress default shortcode [gallery] and then added some extra HTML elements. By this, each time we call the shortcode [wptoro_gallery], we will be pulling the WordPress shortcode [gallery] as well.
This is the result:

Best WordPress shortcode plugin
Now that we understand how the WordPress shortcode works and how to create one yourself manually. Let’s explore some of the recommended shortcode plugins in WordPress.
1. Shortcodes Ultimate

A collection of visual and functional elements, which you can use in the page or post editor, text widgets or even in template files. You can also create the following elements easily:
- Buttons
- Boxes
- Tabs
- sliders
- Carousels
- responsive videos
- And many more!
This plugin is good for ready-made elements so make sure to try it out and maybe the element you’re trying to make a shortcode for is already available on this plugin.
2. Shortcoder
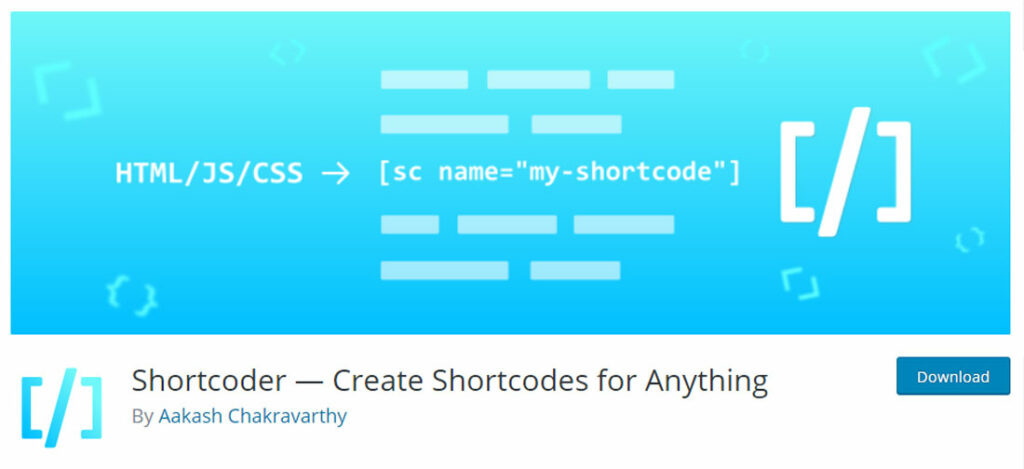
Shortcoder plugin allows to create custom shortcodes for HTML, JavaScript and other snippets. Now the shortcodes can be used in posts/pages and the snippet will be replaced in place.
This shortcode plugin is best for adding some custom content, like when you want to add an AdSense Ad, you can easily create a shortcode, paste the AdSense code then you’re good to go and be able to use a shortcode for AdSense anywhere on your site.
You can create a shortcode easily by following these steps:
- Install and activate the shortcoder plugin
- Go to Shortcode » Create shortcode
- Give a name for the shortcode. Example: “wptoro_shortcode”
- Paste the HTML/JavaScript/CSS as shortcode content
- Click on Save button
- Now insert the shortcode [sc name=”wptoro_shortcode”] in your post or page.
- You got the HTML/Javascript/CSS in your post or page.
Conclusion
Wow, you’ve reached the end of our complete WordPress shortcode guide. We know it was a long read but we’re assuming it was totally worth it? Let us know in the comment below.
To recap, we talked about the basics of WordPress shortcodes and know how it works and what it’s usability in WordPress.
We now also understand the 2 types of WordPress shortcodes which are the Self-closing and the Enclosing shortcode, and what their respective functions are. We also dissected the WordPress shortcode structure piece by piece to understand it much better.
By this time, we also now know how to create simple to advanced WordPress shortcodes as well as saw more use case scenarios from our many WordPress shortcodes examples above. So we hope that the example we made helped you out in some ways to know more about the WordPress shortcode full capabilities.
Inserting WordPress anywhere on your site should also now be cleared by our guide on how it inserts shortcodes to the content editor, widgets, header, footer as well as templates.
We suggested our recommended WordPress shortcode above, but we encourage you to fully understand the WordPress shortcode first before you use these plugins. Just like in real life, before you go fishing on your boat make sure you know how to swim first.
That’s it! Thank you for taking the time to read this article, as always if you have some questions or suggestions, leave a comment down below.
– WPToro Team! ❤️